technological innovation
In-depth Understanding of Surface Roughness in Metal Machining
1. The Concept of Surface Roughness
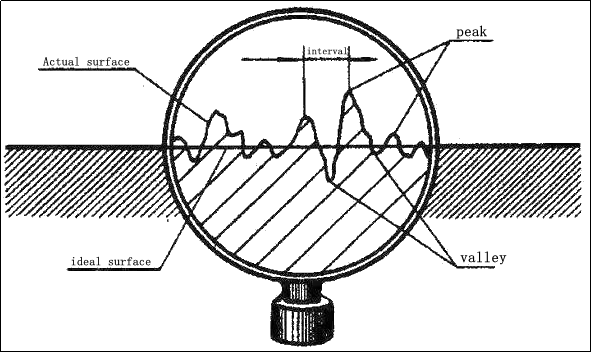
After machining, parts may have small or large peaks and valleys on their surfaces caused by cutting tools, chips, burrs, and scales. These peaks and valleys have very small amplitudes and are usually visible only under magnification. This micro-geometric feature is referred to as surface roughness.

2、Evaluation Parameters of Roughness
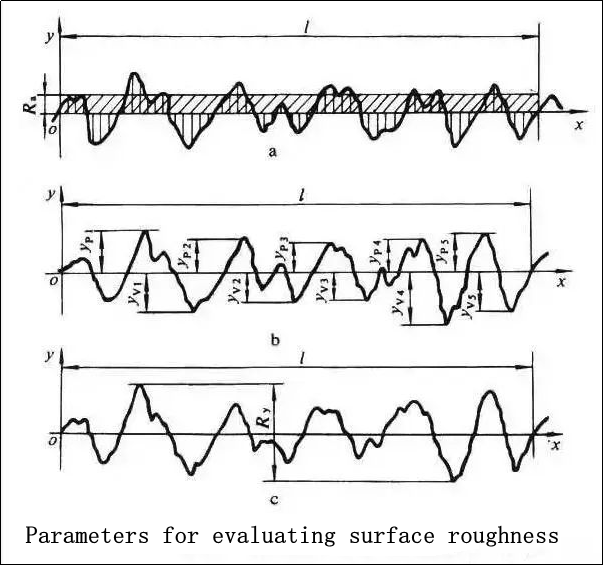
Roughness is assessed using three codes: Ra, Rz, and Ry, accompanied by numerical values. Mechanical drawings often include specific requirements for surface quality, and when the surface roughness Ra is less than 0.8um, it is referred to as a "mirror finish" surface.

Contour arithmetic mean deviation Ra: The arithmetic mean of the absolute value of the contour deviation within the sampling length L
Micro unevenness ten height Rz: Sum of the average of the 5 largest profile peak heights and the average of the 5 largest profile valley depths in the sampling length l
Maximum profile height Ry: the distance between the peak line of the profile and the bottom line of the profile within the sampling length L
3, roughness measurement and labeling
Surface roughness can be quantitatively assessed by measuring Ra, Rz and Ry values with electronic or optical instruments. In actual production, roughness is often identified by human vision and touch, and the sample is compared with the machined surface.
Marking method: mark the features of the machined surface with symbols on the part drawing. Is the basic symbol, using this symbol alone is meaningless, annotated parameter values indicate that the surface can be obtained by any method.
4.Surface roughness and its impact on the performance of mechanical components
Surface roughness has a significant impact on the quality of components, primarily focusing on their wear resistance, fitting properties, fatigue strength, dimensional accuracy, and corrosion resistance.
4.1 Impact on friction and wear: The influence of surface roughness on component wear is mainly manifested in the contact between peak tops. When two components come into contact with each other, only a portion of the peak tops actually make contact, resulting in high contact pressure that can cause material deformation. The rougher the surface, the more severe the wear.
4.2 Impact on fitting properties: Component fitting can be categorized into two forms: interference fit and clearance fit. For interference fit, during assembly, the surface peak tops are flattened, reducing the interference amount and weakening the connection strength of the components. For clearance fit, as the peak tops are continuously worn down, the clearance increases. Therefore, surface roughness affects the stability of fitting properties.
4.3 Impact on fatigue strength: The rougher the surface of a component, the deeper the surface grooves, and the smaller the radius of curvature in the valley. This makes the component more sensitive to stress concentration. Consequently, as surface roughness increases, the component's ability to withstand fatigue strength decreases.
4.4 Impact on corrosion resistance: Larger surface roughness of a component, meaning deeper valleys, makes it easier for dust, degraded lubricating oil, acidic and alkaline corrosive substances to accumulate in these grooves and penetrate into the material's subsurface, intensifying corrosion of the component. Therefore, reducing surface roughness can enhance the component's corrosion resistance.
5. Methods for improving surface finish
It is mainly divided into two types: increasing the corresponding process and improving the original process
Increase the corresponding process: increase the polishing, grinding, scraping, rolling and other processes, can not only improve the finish but also improve the accuracy; In addition, the ultrasonic rolling technology at home and abroad combined with the plastic flow of the metal, different from the cold hardening of traditional rolling, can improve the roughness of 2-3 grades, and improve the comprehensive performance characteristics of the material.
Hence, it is crucial to consider controlling and improving surface roughness during the design and manufacturing process of mechanical components to enhance their quality and performance.
Improvements to the original process:
5.1 Reasonable selection of cutting speed. Cutting speed V is an important factor affecting surface roughness. When processing plastic materials, such as medium and low carbon steel, low cutting speed is easy to produce scale thorns, and medium speed is easy to form chip nodules, which will increase roughness. Avoid this velocity region, the surface roughness value will be reduced. Therefore, constantly creating conditions to improve the cutting speed has always been an important direction to improve the technological level.
5.2 Reasonable selection of feed rate. The size of the feed directly affects the surface roughness of the workpiece, under normal circumstances, the smaller the feed, the smaller the surface roughness, the brighter the surface of the workpiece.
5.3 Reasonable selection of tool geometric parameters. Front corner and back corner. Increasing the front Angle can reduce the extrusion deformation and friction when the material is cut, and also reduce the total cutting resistance, which is conducive to chip removal. When the current Angle is constant, the larger the back Angle is, the smaller the radius of the cutting edge is and the sharper the cutting edge is. In addition, it can also reduce the friction and extrusion between the back tool surface and the machined surface and the transition surface, which is conducive to reducing the surface roughness value. The surface roughness of the tool tip decreases with the increase of the arc radius r. The surface roughness value can also be reduced by reducing the subdeclination Angle Kr of the tool.
5.4 Selecting the right tool material. Tools with good thermal conductivity should be selected in order to transfer cutting heat in time and reduce the shaping deformation of the cutting zone. In addition, the tool should have good chemical properties to prevent the affinity between the tool and the material to be processed, when the affinity is too large, it is easy to produce chip nodules and scales, resulting in excessive surface roughness. If the surface is coated with cemented carbide or ceramic material, the cutting time, the tool surface to form an oxide protective film, it can reduce the coefficient of friction between the machining surface, so it is conducive to improving the surface finish.
5.5 Improve the performance of the workpiece material. The toughness of the material determines its plasticity, and the possibility of plastic deformation is large when the toughness is good, and the surface roughness of the parts is greater when the machine is processed.
5.6 Choose the right cutting fluid. The correct selection of cutting fluid can significantly reduce the surface roughness. The cutting fluid has the functions of cooling, lubrication, chip removal and cleaning. It can reduce the friction between the workpiece, the tool and the chip, take away a lot of cutting heat, reduce the temperature of the cutting zone, and remove the fine chip in time.
RELATED NEWS
- Not sure about the T4, T5, and T6 materials of aluminum profiles? This article h 2024-03-20
- How to use aluminum profile section design skills to solve extrusion production 2024-03-19
- Factors affecting the life of trimming and punching molds 2024-03-12
- Overview of Steel/Aluminum Welding Technology 2024-02-29
- Steel belt conveying direction 2023-09-26
CATEGORIES
LATEST NEWS
CONTACT US
Contact: Manager:Miss Jasmien
Phone: +8618825429836
E-mail: info@gdaa-cn.com
Whatsapp:+8618825429836
Add: Headquarter:No.8,Yixian Road,GDAA Mansion,Guangfo Zhicheng, Dali Town,Foshan,Guangdong.China
